Complete Contents
Introduction
Chapter 1 Using Netshare
Chapter 2 About Web Server Publishing
Chapter 3 Installing and Configuring
Chapter 4 Web Publisher Quickstart
Chapter 5 Services and Menus
Chapter 6 Search
Chapter 7 Access Control
Previous Contents


Chapter 7 Controlling Access

You can control who accesses your Web Publisher documents and directories and what operations different users or different groups of users can perform upon them. You can completely prohibit access to a file or folder or you can restrict access to certain authenticated users.

Note
You can display or modify access control only for your own files or folders. If you want to define the access permissions for a file or folder that has no owner, you must first go to the Web Publisher Services page and use the Properties form to assign ownership to yourself. See the section, "Ownership of Files and Folders," for more information about this topic.

Access control is based on a hierarchy of rules that specify certain restrictions. A set of rules is called an access control list (ACL). The access control hierarchy is based on the URL Path or file path, with ACL rules cascading from the top down through each progressively lower layer of directories and subdirectories until it reaches the file. When a request for access is made, the server goes in turn through each rule, continuing until it encounters a rule that prevents it from continuing or comes to the last rule for that resource.

This chapter discusses these topics:


User Authentication
You identify yourself by entering your user name and password in a dialog box or by using a client certificate installed in your web browser, such as Netscape Navigator or Netscape Communicator.

If your server isn't handling authentication for you with certificates, you must be defined in the server's users and groups database, which can be either a file stored on the web server computer or an LDAP server on a remote computer (for example, a computer running Netscape Directory Server).

When you attempt to access a file or directory that has User-Group authentication, the web browser displays a dialog box asking you to enter your user name and password. Figure 7.1 shows the default iPlanet Web Server authentication dialog box.

Figure 7.1    The authentication dialog box.

After entering the information, you are either allowed to access the file or directory listing requested or you are denied access. You can be denied access because you are not in the Users and Groups database, and are therefore unknown to the server, or because you have been specifically denied access in an access control rule.


Web Publisher Access Permissions
Web Publisher has many operations that are restricted to the broad category of valid server user. Many ACL rules, such as that for agents services, simply require a user to be valid for the server. That is, users who are defined in the server's users database.

When you start Web Publisher, you are immediately prompted with the user name authorization dialog box. You can leave this blank and operate as an anonymous user, but as soon as you attempt to perform an operation restricted to a valid user, you are again prompted for your user name. At this point, you are also asked to enter your password, and only authenticated users can continue with the operation.


Ownership of Files and Folders
Web Publisher files and folders can be owned by individual users. Only the owner of a file or folder can define its access control definitions or reassign its ownership. If a file or folder has no owner, no one can modify its access control. As discussed in the sections "Setting Access: An Example" and "Setting Users and Groups," you can define an access control definition that restricts certain operations to the user who is the current owner of a file or folder, even when ownership is reassigned.

Your server administrator can do a bulk ownership assignment for you, you can assign ownership for an individual file or folder through the Web Publisher properties page, or you can become the owner of a file or folder as a result of an automatic assignment by Web Publisher when you perform certain actions.

Note
Locked files have a lock owner, which is not the same as being the file's owner. All a lock owner owns is the lock placed on a file. Only they can unlock their lock, with one exception: the server administrator can unlock any file lock.

Manually Assigning Ownership
You can use the properties page that is part of the Web Publisher Services form to manually assign ownership of a file or folder. You an only modify the Owner property is two cases:

In the first case, if you are the owner of a file or folder, you can reassign its ownership to another user. Once you give away ownership, you no longer have any owner privileges. Only the new owner can modify the Owner field and the access control from then on.

In the second case, if there is no owner yet, you can make yourself or another user the owner. As with the previous case, if you make another user the owner, you lose your ability to modify the Owner field or the access control from then on.

Automatic Assignment
When you use certain operations on files or folders without an owner, Web Publisher automatically assigns you as the owner. If a file or folder already has an owner, Web Publisher does not reassign ownership. When you perform one of these operations on a folder, you are also assigned as owner to all its files.

Web Pub operations that assign ownership to files or folders that have no owner:


Setting Access: An Example
You can restrict access to the files and folder that you own. This section takes you through an example of restricting access to the owner of a file. In the example, the chosen file is the index.html file for the default document directory. The steps given are the same ones you would use for defining access control rules for any file or folder.

  1. Select the index.html file in the Web Publisher applet window.
  2. At this point, there are three ways to obtain the access control interface from Web Publisher:

  1. Click New Line to get a new default rule. Leave this unchanged. The default rule that you begin with denies everyone everything. Once you've done this, you can expand the access to include specified users and groups, as in the next step.
  2. Click New Line again to get another default ACL rule as the bottom row of the table. You can use the up and down arrows in the left column to move a rule, if needed.
  3. Figure 7.2    A sample ACL for the owner of a file

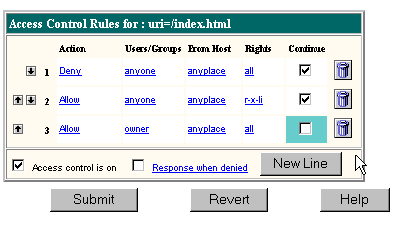
  4. You can allow access to this file by clicking the Deny link in the Action column. The bottom frame now displays the Allow/Deny form. See the section See "Setting Actions" for more details.
  5. Click Allow and then click Update to return to the top frame with the new data.
  6. You can allow access to a specific user by clicking the Anyone link in the Users/Groups column. The bottom frame now displays the User/Group form. By default, there is no authentication, meaning anyone can access the resource. See "Setting Users and Groups" for more details.
  7. You can restrict access to a computer or network by clicking the Anyplace link in the From Host column. See "Specifying Host Names and IP Addresses" for more details on how to use this advanced option.
  8. You can restrict access to certain operations by clicking the All link in the Rights column. The bottom frame now displays the Access Rights form. By default, the user has access to all operations. See "Setting Rights" for more details.
  9. Add another new line, this time allowing the owner to have write and delete access as well. Complete steps 4-6.
  10. In most cases, this is all you need to do to define an ACL for your file, so click Submit to set up this ACL for your index.html file. See "Additional Options" for details about other options you can use.

Access Control: The Details
The Web Publisher access control interface allows a wide and flexible range of access definitions. The interface has two frames, with the top part displaying the ACL rules that are being updated with new or modified data from the several different forms that are shown in the bottom part. The top frame has several icons and checkboxes that you can use to customize your access control.

Setting Actions
You can specify the action the server takes when a request matches the access-control rule.

Setting Users and Groups
You can restrict access to your file or folder based on the user who is making the access request. With user and group authentication, users are prompted to enter a user name and password before they can access the resource specified in the access-control rule. The web server uses a list of users and groups to determine access rights for the user requesting a resource. This information is stored either in a database on the web server computer or in an LDAP server such as Netscape Directory Server.

You can allow or deny access to everyone in the database, or you can allow or deny specific people by using wildcard patterns or lists of users or groups. You need to use a person's user name as defined to the server, not their actual name. For example, you could restrict access to JSmith only, or to the owner of a file, or to anyone who's name begins with the letter s (by entering the wildcard pattern s*).

When you click the Users/Groups link, a form appears in the bottom frame. The following list describes the options in the form:

Setting Rights
You can set access rights to your Web Publisher files and directories. That is, in addition to allowing or denying all access rights, you can specify a rule that allows or denies partial access rights. For example, you can give people read-only access rights to your files, so they can browse a file but cannot edit it.

When you create an access-control rule, the default access rights are set to all access rights. To change access rights, click the Rights link in the top frame, and then check or uncheck the access rights you want to set for a particular rule. The following list describes each access right you can check:


The Access Control Window
There are some special graphical elements in the ACL window that help you rearrange and delete individual rules. There is also a checkbox that allows you to redefine what users see when they are denied access to a resource.

Moving Rules Up and Down
Rules are applied in the order in which the server encounters them. Once you define a rule, you can use the arrows on the left of each rule to rearrange the sequence of rules for a resource. This is especially useful when you want to temporarily define an absolute rule that blocks access to later rules. By moving the rule up in the sequence, you don't need to delete the rule and recreate it later. Just place it below the absolute rule, and the server never checks it.

Deleting ACL Rules
When you uncheck the "Access control is on" option, you are prompted to confirm if you want to erase records in the ACL file. When you click OK, the server deletes the entire set of access control rules for that resource.

A less drastic way of deleting an access control rule is to click the Trash can icon at the end of each line to delete a single rule.

Response When Access is Denied
You can choose the response a user sees when denied access. You can vary the message for each file or folder. By default, the user is sent a message that says the file wasn't found (the HTTP error message 404 Not Found is also sent). In general, do not change this setting without consulting with your server administrator.

To change the message that is sent for a particular resource when access is denied:

  1. In the top frame, click the link called "Response when denied." The Access Deny Response form is displayed in the lower frame with the default option set.
  2. Click the radio button labeled "Respond with the following url."
  3. In the text field, type the URL for the file (text or HTML) in your server's document root that you want to send to users when they are denied access. Make sure the file doesn't contain references to other files (such as style sheets) or images because they won't be sent.
  4. Click Update to return to the top form.
  5. Click Submit to set this response as part of the access control rule.
Note
Make sure any users who get the response file have access to that file. That is, if you have access control on the response file and the user is denied access to both the original resource and the response file, the server sends the default denied response.


Additional Options
Most users do not need the additional ACL features described in this section, but there may be cases where you need these features to provide the desired level of control for a file or folder. For example, you may need special restrictions on personnel directories in the HR group or confidential files belonging to the CEO of a company.

Using the Continue Option
By default, an access control rule has the Continue option checked. This allows lower-level files and folders to have their own ACL rules, which can contradict already defined ACL rules. For example, even though an earlier ACL rule allows anyone to read all files in a directory, you can define a rule for your files in this directory that denies access to everyone but yourself.

You could, however, set an ACL rule for a folder that prevents its files from having ACL rules that defined access in a different way. This is referred to as absolute control, and you set this option by unchecking the Continue checkbox. When the server evaluates the access control rules for a resource, it stops whenever it encounters a rule that does not have Continue checked.

For example, suppose someone requests the following file:

http://www.mozilla.com/docs/Project-X/presentation.html

The server checks all ACL rules that affect the object. First it checks any overall permissions for the server, then it checks the permissions for the /docs directory and then those for the /Project-X subdirectory. The server continues checking ACL rules until it reaches the ACL for the requested URL (in this case, the file presentation.html) or until it reaches an ACL rule that has the Continue option unchecked.

Once an absolute rule is encountered, the ACL defined as of that point is the only operative access control rule. You cannot define less restrictive rules for files or folders at lower levels of the document tree.

Specifying Host Names and IP Addresses
Although you probably won't need to do this, you can limit access to files and folders by making them available only to people using specific computers. You can use wildcard patterns to specify multiple computers or entire networks. If you want to use this feature, you must have DNS running in your network and your computer must be configured to use it.

Note. It's possible for more than one person to have access to a particular computer. For this reason, Host-IP authentication is most effective when combined with User-Group authentication. If both methods of authentication are used, the end user has to enter a user name and password before getting access.

You specify this restriction by using wildcard patterns that match the computers' host names or IP addresses. For example, to allow or deny all computers in a specific domain, you would enter a wildcard pattern that matches all hosts from that domain, such as *.netscape.com.

To specify a host name or IP address, follow these steps:

  1. Click the Anyplace link in the From Host column in the top part of the ACL form. The From Host form is displayed in the bottom frame.
  2. In one of the fields under the Only From option, type a wildcard pattern or a comma-separated list of hostnames or IP addresses.
  3. Click Update to return to the top part of the ACL form with the new or modified data.
  4. Click Submit to modify the access control rule.
Restricting by hostname is more flexible than by IP address—if a user's IP address changes, you won't have to update this list. Restricting by IP address, however, is more reliable—if a DNS lookup fails for a connected client, hostname restriction cannot be used.

The hostname and IP addresses should be specified with a wildcard pattern or a comma-separated list. The wildcard notations you can use are specialized; you can only use the *.

For IP addresses, the * must replace an entire byte in the address. That is, 198.95.251.* is acceptable, but 198.95.251.3* is not. When the * appears in an IP address, it must be the right-most character. For example, 198.* is acceptable, but 198.*.251.30 is not.

For hostnames, the * must also replace an entire component of the name. That is, *.netscape.com is acceptable, but *sers.netscape.com is not. When the * appears in a hostname, it must be the left-most character. For example, *.netscape.com is acceptable, but users.*.com is not.


© Copyright © 2000 Sun Microsystems, Inc. Some preexisting portions Copyright © 2000 Netscape Communications Corp. All rights reserved.